TON AppKit Starter
A starter template for building applications with the TON AppKit
TON AppKit Starter is a Telegram Mini App starter kit built with TON AppKit, React, TypeScript, and Vite. Covers main AppKit features: wallet connection, balance monitoring, and TON transfers.
Runs on testnet by default. Switch to mainnet by changing
NETWORKinsrc/utils/constants.ts.

Features
- 💎 Connect/disconnect TON wallet via TON Connect
- 📊 Real-time balance monitoring with polling
- 📤 Send TON to any address with optional comment
- 🔗 Transaction confirmation with Tonscan explorer link
- 📱 Telegram Mini App ready — theme sync, viewport expand, safe area support
- 👤 Telegram user info — name
- 🌗 Light/dark mode — syncs with Telegram theme, falls back to system preference
- 🌐 Works in a regular browser too
Prerequisites
- Node.js 18+
- A TON wallet (e.g. Tonkeeper) with testnet mode enabled
- Optional: a free TonCenter API key for higher rate limits
Setup
1. Clone the repository
https://github.com/thisonedev/vault.git2. Enter ton-appkit-starter directory
cd ton-appkit-starter3. Install dependencies
npm install4. Configure environment
cp .env.example .envOpen .env and fill in your values:
# Optional but recommended — avoids rate limit errors
TONCENTER_API_KEY=<your_api_key_here>

# Your app's TON Connect manifest URL
# The demo manifest below works fine for local development
MANIFEST_URL=https://tonconnect-sdk-demo-dapp.vercel.app/tonconnect-manifest.json
Running an app
npm run devOpen http://localhost:5173 in your browser.
Running as a Telegram Mini App
Telegram requires a public HTTPS URL to load a Mini App. During development, use ngrok to tunnel your local dev server.
1. Start your dev server
npm run dev2. In a separate terminal, start ngrok
npx ngrok http 5173Copy the https:// URL ngrok gives you, e.g. https://abc123.ngrok-free.app
3. Create a Telegram bot
- Open @BotFather on Telegram
- Send
/newbotand follow the prompts — pick a name and username - BotFather gives you a bot token — save it for later
4. Set the Mini App URL
- Send
/mybotsto BotFather - Select your bot → Bot Settings → Menu Button → Configure menu button
- Paste your ngrok URL
5. Open the Mini App
- Open your bot in Telegram
- Tap the Menu button (bottom left, next to the message input)
- Your app loads as a Mini App
Your app hot-reloads automatically on code changes — no need to restart ngrok or reconfigure BotFather unless the ngrok URL changes.
Note: Free ngrok generates a new URL every time you restart it. To keep a stable URL during development, keep ngrok running or use a paid plan with a fixed domain.
Production: Deploy to any static host (Vercel, Netlify, Cloudflare Pages) and set that URL in BotFather instead.
Project Structure
ton-appkit-starter/
├── index.html                        # Entry point — includes Telegram WebApp script
├── vite.config.ts                    # Vite config with Buffer polyfill and @ alias
├── tsconfig.json                     # Root TypeScript config with project references
├── tsconfig.app.json                 # TypeScript config for src/
├── package.json                      # Dependencies and scripts
├── .env.example                      # Environment variable template
├── .gitignore                        # Ignored files — node_modules, .env, dist
├── eslint.config.js                  # ESLint config
├── README.md                         # Project documentation
│
└── src/
    ├── main.tsx                      # React entry — mounts app
    ├── App.tsx                       # Root — AppKit, QueryClient, and provider setup
    ├── index.css                     # Telegram design tokens, Tailwind, global styles
    ├── polyfills.ts                  # Buffer polyfill required by @ton/core
    │
    ├── components/
    │   ├── shared/                   # Reusable UI primitives
    │   │   ├── Card.tsx              # Rounded surface container
    │   │   ├── CardRow.tsx           # Label/value row with optional divider
    │   │   ├── FormField.tsx         # Input with error message
    │   │   └── SectionTitle.tsx      # Section label above cards
    │   │
    │   ├── telegram/                 # Telegram-specific components
    │   │   └── TelegramProvider.tsx  # SDK init, theme sync, user/colorScheme context
    │   │
    │   ├── transfer/                 # Send flow
    │   │   ├── SendTon.tsx           # Transfer form using SendTonButton
    │   │   └── TransactionStatus.tsx # Success/error toast with Tonscan link
    │   │
    │   └── wallet/                   # Wallet state and display
    │       ├── Balance.tsx           # TON balance with polling
    │       ├── WalletConnect.tsx     # Connect/disconnect button
    │       └── WalletInfo.tsx        # Address, network badge, explorer link
    │
    ├── hooks/
    │   └── useIsConnected.ts         # Returns true if a wallet is connected
    │
    ├── types/
    │   ├── index.ts                  # Shared TypeScript interfaces
    │   └── telegram.d.ts             # Global type declarations for window.Telegram.WebApp
    │
    └── utils/
        ├── constants.ts              # Global constants — network, URLs, intervals
        └── ton.ts                    # Helper functions — formatting, validation, API
Components
TelegramProvider
Initialises the Telegram Mini App SDK and syncs Telegram's theme to CSS variables. Wraps the entire app so any component can access the Telegram context via useTelegram().
- Calls
tg.expand()to make the app full screen - Calls
tg.ready()to hide the native loading indicator - Listens to
themeChangedevents and updates CSS variables in real time - Exposes
isTMA,colorScheme,isReady, anduservia context
import { useTelegram } from '@/components/TelegramProvider';

const { isTMA, colorScheme, isReady, user } = useTelegram();

// Show Telegram username
<p>Welcome, {user?.first_name ?? 'anon'}</p>
WalletConnect
Connect/disconnect button. Shows a connect button when no wallet is connected, and a connected state with a shortened address and disconnect option when a wallet is connected.
Uses useTonConnectUI from @tonconnect/ui-react to open the TON Connect modal.
WalletInfo
Displays wallet details after connection:
- Wallet app name (e.g. Tonkeeper, MyTonWallet)
- Network badge — Testnet (yellow) or Mainnet (green), read from
wallet.account.chain - Full address with tap-to-copy
- Link to the wallet on Tonscan
Only rendered when a wallet is connected.
Balance
Displays the connected wallet's TON balance. Polls every BALANCE_POLL_INTERVAL_MS (10 seconds by default) to keep the value fresh.
- Shows a skeleton loader while fetching
- Shows the balance formatted to 2–4 decimal places
- Shows a retry button on error
Uses useBalance() from @ton/appkit-react.
SendTon
A transfer form with three fields: recipient address, amount (TON), and an optional comment. Uses SendTonButton from @ton/appkit-react which handles the wallet interaction internally.
- Validates the recipient address format and amount before sending
- Disables the button while a transaction is pending
- Passes success/error results to
TransactionStatus
Only rendered when a wallet is connected.
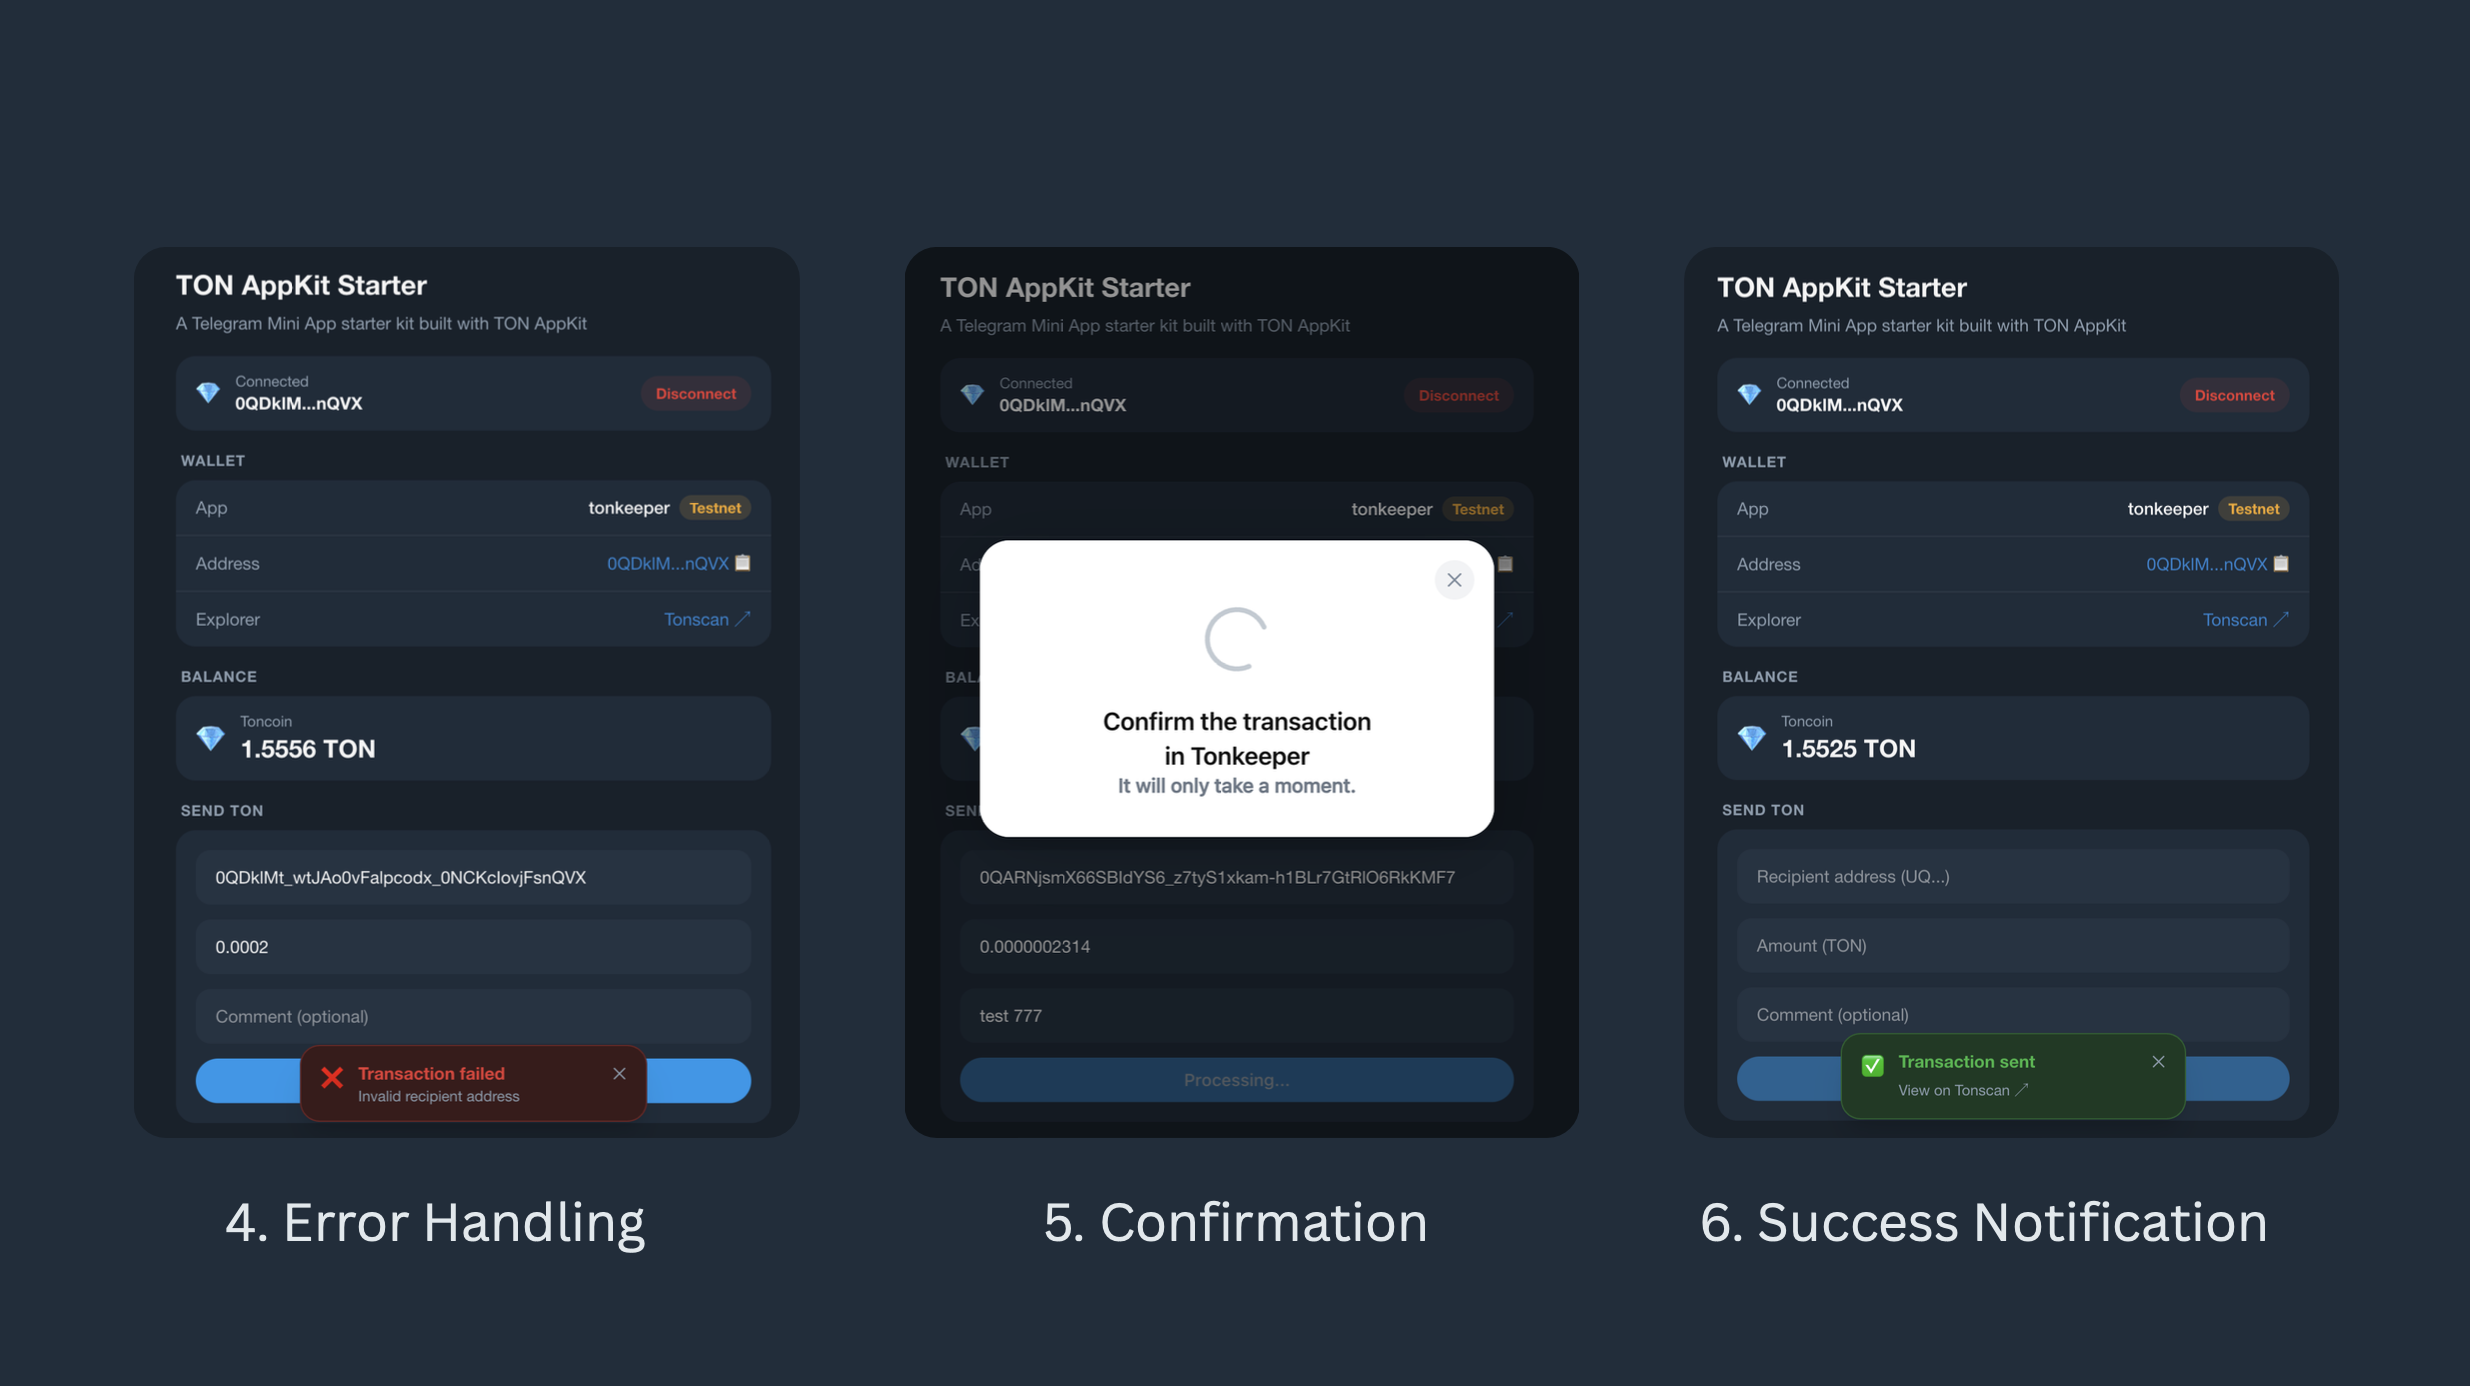
TransactionStatus
A toast notification shown after a send attempt.
- Success: shows "Transaction sent" and polls the TonCenter API every 2 seconds (up to 10 attempts / 20 seconds) until it finds the transaction hash, then shows a direct Tonscan link
- Error: shows a human-readable error message (e.g. "Transaction cancelled" instead of the raw SDK error)
- Auto-dismisses after 12 seconds on success, 8 seconds on error
- Can be manually dismissed with the ✕ button
Switching to Mainnet
Change the following values in src/utils/constants.ts:
export const NETWORK = Network.mainnet();
export const TONCENTER_BASE_URL = 'https://toncenter.com';
export const TONSCAN_BASE_URL = 'https://tonscan.org';
And update your .env:
TONCENTER_API_KEY=<your_mainnet_key>Tech Stack
| Package | Purpose |
|---|---|
@ton/appkit-react | AppKit React hooks and components |
@tonconnect/ui-react | TON Connect wallet hooks |
@tanstack/react-query | Data fetching and caching |
tailwindcss | Utility-first CSS |
buffer | Node.js Buffer polyfill for the browser |